
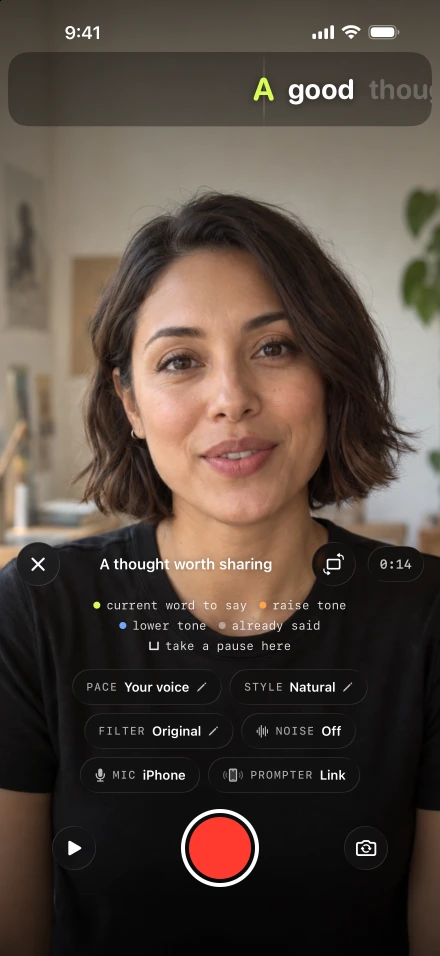
Before pressing record, make three decisions: where the finished video will fit, where you will read, and which microphone will hear you. Getting those choices settled leaves your attention on the message. The iPhone recording walkthrough covers a full setup; here are the recording controls within Lightshot.
Put the camera where the conversation belongs
The recorder starts with the front camera, with Switch camera available for the rear camera. In portrait, Near lens places one line under the front lens. The alternative Script layout is a movable, resizable panel. Choose the layout you can read without repeatedly searching across the frame.
A 2024 preprint about perceived eye contact found that looking just below the lens can be preferable to other gaze positions. That does not guarantee a natural eyeline for every setup. Record a short sample and use the eyeline guide to judge it from the viewer’s position.
Northwestern recommends a camera at or slightly above eye level and light from the front. Northern Illinois University also advises even window light and a supported phone. Arrange the room before choosing a cosmetic filter; a look cannot put missing light back on your face.
Where does the near-lens line sit?
On an iPhone with a Dynamic Island, Near lens puts the word you are about to say under the camera cutout, about 44 points right of the screen’s middle, on one line that rises just under the island. On other iPhones the middle of the screen is the starting point. In landscape the line runs beside the lens, at its height, with the word to say at the camera end.
iOS doesn’t tell an app exactly where the lens is, so the recorder’s Prompter sheet lets you place the line yourself. Reading point slides the word to say along the portrait line, and Under the camera puts it back. Distance from camera runs from −30 to 160 points; below zero the line tucks partly under the cutout. Padding sets 0 to 24 points of room above and below the words, and Font size runs from 18 to 44 points, or pinch the line. Smaller words sit closer to the lens.
The same sheet styles the words in both layouts: a text color and a Word to say color, a Rounded, Classic, Serif or Mono typeface in Medium, Bold or Heavy, and Background opacity from clear to solid, which changes the backing and never the words. Orange and blue delivery marks keep their colors. These controls change where you read, not where the camera sees you looking, so judge the result in a short playback.
Can you record in landscape?
Yes, as long as you choose it before the take. Use the rotate control before filming, or Settings › Recording › Orientation, to select Portrait or Landscape. The recorder holds that orientation for the take. In landscape, the words sit beside the camera while the rest of the app remains in portrait.
Frame for the most demanding destination first. If you need more than one version, leave room around your head and hands for alternate-shape exports. For a separate reading screen or a glass rig, the two-iPhone setup gives the script its own display.
Ca Lightshot record 4K at 60 fps?
Yes, where the front camera supports it; otherwise it records the nearest setting it can and says so. Resolution offers 1080p or 4K; Frame rate offers 24, 30 or 60 fps. The defaults are 1080p and 30 fps. Availability depends on the camera. If the chosen combination cannot be recorded, the fallback first tries the same resolution at 30 fps, then 1080p at the selected rate, then 1080p at 30 fps.
4K uses HEVC where available; 1080p uses H.264. Apple explains the relationship between HEVC files, storage and compatibility. Check available recording space before a long session, and remember that saving additional copies and exports also uses storage.
Which microphone is recording?
The one the Mic control names; tap it to choose another. The control names the input and opens iOS’s microphone picker. Apple documents input selection through Control Center where supported. Make a spoken sample and play it back: a selected device alone does not tell you whether the voice is clear. The microphone help article explains the app’s checks and permissions.
Connecting or disconnecting a microphone during recording pauses the take. If no microphone is available or access is missing, the recorder asks whether to continue without sound. Keep a soundless recording only when that is what you intended; voice-following and speech captions need usable audio.
Rehearse, record and preserve the original
Rehearse without recording runs the prompter before any footage is captured. With voice-following enabled, practice a pause and a return to the lit word. Set the countdown to off, three seconds or five seconds, then record. Use pause and sentence redo for a local correction.
The recorder gives pace cues against your chosen target: Ease off, let it land when you are above it, or Pick it up, keep it moving when you are below it or have paused. Treat those as rehearsal feedback, not instructions to hurry through an intentional silence. Afterward, How it went shows average and peak pace, pauses, parts and repairs. When recognition is unavailable, the pace report is labeled as an estimate.
The preview is mirrored; saving a mirrored video is a separate setting, off by default. A recording filter remains changeable after the take in the editor. Turn on Save each take to Photos if you want a separate copy of every raw recording. These controls let you decide which version to keep instead of discovering a permanent choice after the performance.