
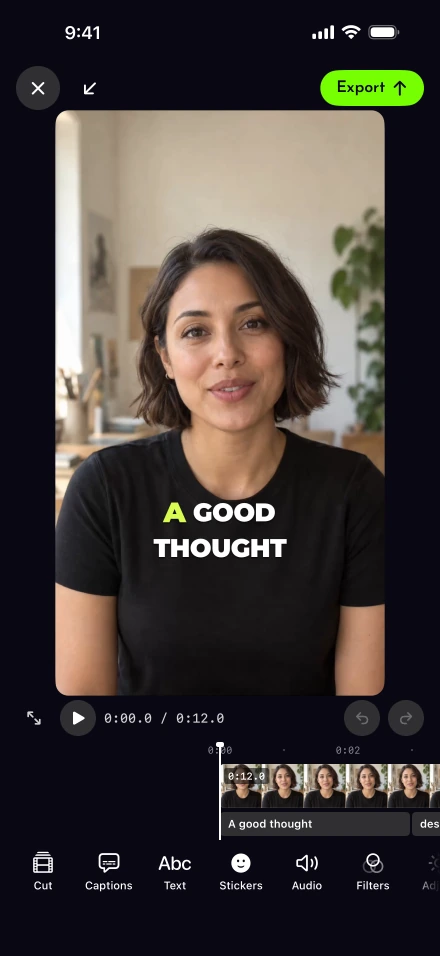
A finished recording may contain one line too many, a section that belongs earlier or an explanation that needs a picture. The editor lets you make those decisions on the recorded material. It is one part of the Lightshot toolset, with auto edit available for an initial cut and manual tools for the changes that depend on your judgment.
How do you cut a talking-head take in Lightshot?
Split, trim, delete or reorder pieces of the take, or remove a line by tapping its words in the transcript. Open Edit video from review. Split and trim the selected video, delete an unwanted piece, or move a piece Earlier or Later. The project contains one take; these controls reorder sections inside it rather than assembling several independent camera takes.
For a verbal change, generate captions first and open Transcript from the video controls. Tap the first and last word of a line you want to remove, then cut that passage from the footage. Undo restores the action if you chose too much. A mistake caught during filming can instead use sentence redo in the recorder.
Per-piece speed ranges from 0.25× to 4× while preserving voice pitch. Zoom and pan support keyframes, and ten transition choices run from a dissolve to a wipe or fade. Use a transition when it explains a change of scene or topic; inspect the plain cut first. The silence-editing guide helps distinguish an empty gap from a useful pause.
Show the detail the listener needs
Add a text layer for a name or a label that speech alone does not convey. Stickers include 80 emoji in five groups and pictures from Photos; layers can be moved, resized, rotated, animated and keyframed. A picture set to Full frame becomes a cutaway below the other layers, with its opacity and entrance or exit animations kept.
Keep text away from the essential picture. DCMP’s placement guidance warns against covering faces and graphics with captions, and that is a sensible review check for added labels too. W3C distinguishes speech text from other caption information; decorative words on screen do not replace a checked transcript.
Can you add music and a voice-over?
Yes: music from your own files, which dips under speech, and a voice-over recorded while the video plays. The Audio tools accept music from Files in MP3, M4A, WAV or AIFF format. Use a file you have permission to include; there is no bundled music catalog, and protected Apple Music downloads cannot be imported. Music starts at a lower level, with fades and ducking beneath speech. Listen through the quietest spoken section when setting the balance.
Record a voice-over after a three-second count-in while the video plays. Headphones let you hear playback during that recording. Keep the original voice, lower it to 20% or mute it under the new narration; then move or trim the voice-over. Optional captions follow that narration when it moves. The presentation workflow is one use for explaining prepared visual material.
Noise cleaning has Light, Medium and Strong settings and preserves the original audio. Improve the capture first when possible: Northwestern’s recording advice addresses microphone placement and background noise. A clean input through the recorder gives later audio choices more room.
Can you change the background behind you?
Yes, on ordinary takes: the editor keeps you and replaces the room. Under Canvas, Background can keep the original, blur it, use a color or add a picture. Blur has Soft, Medium and Strong levels. Person separation works best with one well-lit subject; when no person is detected, that frame stays as recorded. Review hair, hand movement and objects near the outline before accepting the result.
Demo takes use Presenter layouts instead and do not offer this background replacement. For ordinary footage, 34 looks in seven groups add a color treatment with adjustable intensity. Seventeen adjustment sliders cover light, color and detail, with Smart balance available. Compare against the unadjusted frame before adding another correction.
Keep repeating brand elements together
The brand kit can store up to three preferred colors, a logo or name tag in a corner, and intro or outro cards lasting one to three seconds. Use brand applies the kit during auto edit. For a small business series, use the kit for identification and let the actual offer lead the spoken opening.
Quality controls include Enhance, Reduce noise, Remove flicker and Smooth motion. They apply at export rather than in the live preview; Smooth motion only changes slowed pieces where the device supports it. On a demo take, select the main video in the timeline to reach Quality; it is absent from the initial tool row.
Review the version the viewer receives
Choose the canvas and export size for the destination. YouTube’s Shorts classification depends in part on shape and duration, so a square crop can change how a finished video is treated. Apple’s format guidance also explains why a file’s encoding can matter when moving it between devices.
The export is rendered from the original take each time. Keep enough local storage for that original and the edited output, then play the saved result to inspect sound, captions and effects together. Every editor tool is included across the subscription options; choose the changes because they help this video, not because there is another effect left to add.