
The target is the small front-camera lens, not the center of the display. Find it on your iPhone before you mount the phone. This is the setup part of our on-camera guides; if the eyeline looks right but the speech still sounds read, work through the delivery exercise afterward.
Mount the phone before placing the script
Support the phone so the lens sits around eye level. Sit or stand in the position you will use for the take, then frame your head and shoulders. Avoid balancing a phone where one touch can move it. A stable position makes the eyeline test repeatable.
Northern Illinois University’s self-recording guide recommends propping the phone at eye level and keeping window light even across your face. Northwestern’s webcam guidance puts the camera at or slightly above eye level. These are useful starting positions; they are not instructions to force your neck upward.
Where should the script sit on the screen?
As close to the lens as you can still read it: one line just under the front camera in portrait, or beside it in landscape.
Open your script in Lightshot and enter the recorder.
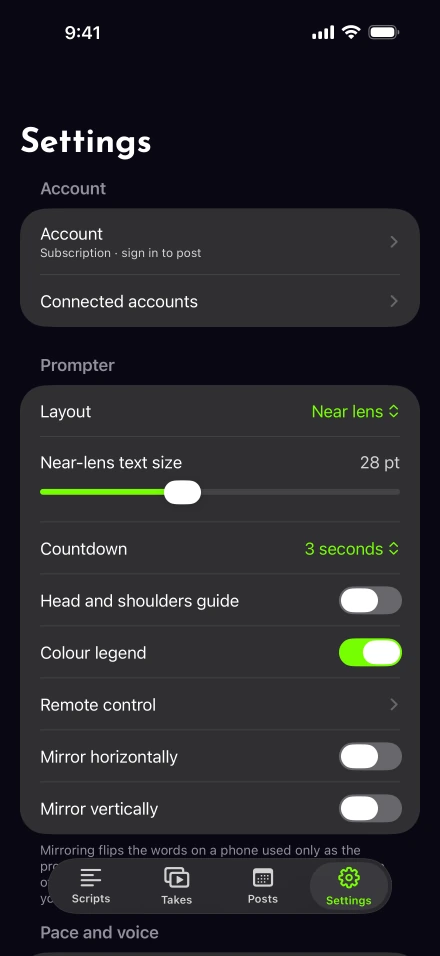
Set the prompter layout to Near lens. In portrait the current line sits under the camera; in landscape the words sit beside it.
Adjust the text size while remaining at your recording distance. Read a sentence containing a long word or a number, not only a familiar greeting.
If you prefer the Script panel, move and resize it so the words you are using are close to the lens. A wide paragraph at the bottom of the screen gives your eyes farther to travel.
How do you line the words up with the lens?
Place the word you are about to say, not the whole sentence. In Lightshot that is the lit word on the Near lens line. On iPhones with a Dynamic Island the app starts it under the camera cutout, a little right of the screen’s middle; on other iPhones it starts in the middle. Check where it lands on your own phone before trusting the default.
In the recorder, open the Prompter sheet and choose Near lens.
Drag Reading point until the thin line on the strip sits right under the front camera. Under the camera returns it to the automatic spot.
Lower Distance from camera or Padding to bring the line up toward the lens. Below zero the line tucks partly under the cutout, so raise it again if the cutout covers part of a word.
Set Font size between 18 and 44 points, or pinch the line, then record a test sentence from your speaking position.
In landscape the line runs beside the lens instead, and Distance from camera moves it sideways, away from the camera. If a bright color keeps pulling your focus, change the Word to say color, the typeface or the Background opacity in the same sheet. None of these settings measures where your eyes point; the silent playback below is still the test.
The recording and layout controls also let you set orientation before a take. Rotate first and repeat the test afterward; a position that worked vertically may point your eyes away from a sideways camera.
How can you tell whether you’re looking at the lens?
Record the same sentence three ways and compare them. Say the same short sentence while looking at the lens, the nearby script line and your own preview. Watch the three samples on a larger display if available. Which one looks like you are speaking to the viewer? Keep the position that works, rather than adopting a universal distance in inches.
The authors of Don’t Look at the Camera, a 2024 preprint report that gaze slightly below the lens can be perceived as eye contact. That finding supports testing a nearby line; it does not establish a precise phone-specific angle or guarantee invisible reading.
For a longer passage, voice-following keeps the next unread word close while you pause. Apple describes the on-device speech model behind this type of recognition; the available languages still vary. Use the language check before relying on it for a recording session.
Match the visible problem to an adjustment
| Visible clue | Adjustment to test |
|---|---|
| Pupils sweep sideways across each phrase | Narrow the movable panel or try the single-line layout. Keep the letters legible instead of shrinking them to fit more words. |
| Gaze drops at each new line | Bring the current passage higher. Judge the location of the words being read, not the top edge of the whole paragraph. |
| Your chin moves forward and your brow tightens | Enlarge the type and repeat from a comfortable posture. Do not make leaning forward part of your reading technique. |
| Your gaze repeatedly jumps to your own image | Finish checking your appearance before the sample. During it, use the current phrase as the target and inspect your appearance afterward. |
Keep the framing and sentence identical between comparisons. Change only the panel position or type size, then label the samples with the adjustment you made. A single successful frame is not enough; inspect the transition from the end of one phrase to the beginning of the next.
If you need to move farther away
Increase type size before moving the words farther from the lens. If the phone is across the room, a second iPhone used as a prompter or glass rig may suit the composition better. A remote or foot pedal can control the take without reaching toward the camera, but accessory compatibility needs a test.
Distance changes sound too. Check which input is active using the microphone picker. Apple’s audio and video recording settings explain how input selection works on iPhone. Play back a sample from the distance you intend to use.
Keep the useful parts of the take
Do not stare without blinking to preserve eye contact. Let your expression follow the thought, then return to the next line. If you lose your place, redo the sentence and continue. A calm pause is easier to edit than a string of apologies.
Check the final crop after exporting another video shape. The crop may change how a sideward glance feels, even though it cannot change where your eyes originally looked. Save the setup that worked so your next recording starts from a known position.